Building a beautiful, long-lasting patio, walkway, or driveway starts with a solid foundation—especially when working with sandy soil common throughout the Jersey Shore. At Cedar Bridge, we know that the right paver base is essential for stability, drainage, and keeping your outdoor investment looking great year after year. In this comprehensive guide, you’ll learn how to choose the best base for pavers in sandy soil, discover the unique challenges sand presents, and get seven strategic tips to ensure your project stands the test of time.

Why Base Selection Is Critical for Pavers in Sandy Soil
Sandy soil is abundant along the New Jersey coastline, including Ocean County and beyond. While sandy soil drains well and is easy to work with, it also shifts easily, offers little natural compaction, and can lead to uneven paver surfaces over time if not properly stabilized. That’s why choosing the right base materials and following proper installation techniques is crucial for any hardscaping project.
Seven Strategic Things to Have in Mind When Choosing a Paver Base in Sandy Soil
1. Understand the Nature of Sandy Soil
Sandy soil is made up of large, loose particles that drain quickly and don’t retain moisture. While this is great for preventing puddles, it can also cause instability. Unlike clay or loam, sand doesn’t compact well on its own, so it needs help to form a solid base. Identifying the type of sand in your yard and its depth will influence your base choices.
2. Layering Is Key: Don’t Rely on Sand Alone
Never lay pavers directly on native sand. For a robust, long-lasting surface, you need a multi-layered base. The typical base for pavers in sandy soils consists of:
- A sub-base of compacted gravel or crushed stone
- A middle layer of finer gravel or stone dust
- A bedding layer of concrete sand or polymeric sand
Proper layering distributes weight, prevents shifting, and ensures excellent drainage.
3. Compaction: The Most Important Step
Each layer, especially the gravel base, must be thoroughly compacted using a plate compactor. In sandy soils, uncompacted layers will shift and settle, causing uneven paver surfaces and potential tripping hazards. Compact in several passes and use water to help finer particles settle, creating a denser base.
4. Use Geotextile Fabric for Extra Stability
Lay a high-quality geotextile fabric between the sandy soil and the gravel base. This smart move prevents the gravel from migrating down into the sand and stops sand from moving up into your base layer. The fabric also helps stabilize the overall structure and minimizes the risk of rutting or paver movement over time.
5. Choose the Right Base Materials
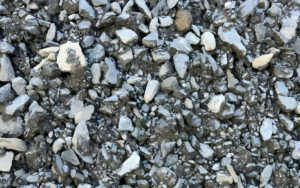
- Crushed Stone or Gravel: Angular aggregate (like ¾-inch minus gravel) locks together better than rounded stones, providing a more stable base.
- Concrete Sand or Polymeric Sand: For the bedding layer, concrete sand allows for proper drainage while providing a smooth surface for laying pavers. Polymeric sand can be swept into joints for enhanced weed resistance and locking strength.
Ask Cedar Bridge’s knowledgeable staff for recommendations on the best local materials for your specific site and project size.
6. Account for Drainage and Erosion Control
Sandy soil drains well, but water can still erode the base if not managed. Slightly slope your paver project away from structures (typically a 1/8” drop per foot) to direct water away. In areas prone to heavy rain, consider edge restraints and additional drainage solutions, such as French drains or permeable paver systems, to protect your base from washouts.
7. Edge Restraints: Don’t Skip This Step!
Edge restraints are absolutely essential for any paver installation in sandy soil. They prevent the pavers from spreading and keep your project tightly locked in place. Use high-quality plastic, metal, or concrete edge restraints, and anchor them securely into the compacted base.
Step-by-Step Guide: Building the Best Paver Base in Sandy Soil
- Excavate the project area at least 6-8 inches deeper than the height of your pavers.
- Lay geotextile fabric over the exposed sandy soil.
- Add a 4-6 inch layer of crushed stone or gravel and compact thoroughly.
- Add a 1-2 inch layer of finer gravel or stone dust and compact again.
- Install edge restraints around the perimeter.
- Add a 1-inch bedding layer of concrete sand.
- Lay your pavers, tapping them into place with a rubber mallet.
- Sweep polymeric sand into the joints and compact for a finished, locked-in look.
Common Mistakes to Avoid
- Skipping geotextile fabric: This can lead to base migration and an unstable surface over time.
- Insufficient compaction: Rushing this step is the #1 reason for uneven pavers in sandy soil.
- Using only sand as a base: Sand alone will shift and wash away, ruining your project.
- Ignoring drainage: Poor water management can lead to erosion and sinking pavers.
- Weak edge restraints: Flimsy or no edge restraints will cause pavers to spread and fail.

Cedar Bridge’s Pro Recommendations
With decades of hands-on experience in Ocean County, Cedar Bridge recommends a robust, layered base system for all paver projects in sandy soil. Our team can help you select the right gravel, sand, and geotextile fabric for your specific application, and we can supply premium Cambridge Paving Stones for a stunning finish. We’re happy to assist homeowners and contractors alike!
- Consult with our experts to assess your soil and recommend the ideal materials.
- Get delivery of all your base and paver materials direct to your project site.
- Ask about our professional installation services for hassle-free, long-lasting results.
Build with Confidence at Cedar Bridge
Choosing the best base for pavers in sandy soil is the foundation of a successful hardscaping project. With the right approach, materials, and expert support from Cedar Bridge, your patio, walkway, or driveway will remain beautiful and stable for years to come.
Ready to get started? Contact Cedar Bridge Landscape or stop by our Ocean County location to speak with our experienced staff. We’ll help you plan, supply, and build your dream outdoor space—one that stands strong on the Jersey Shore’s sandy soils!
You might find interesting
- Fire Pit Kits vs. Custom Fire Pits: Which Option Will Transform Your Backyard into a Cozy Retreat?
- Sod or Seed? The Ultimate Guide to Establishing Your Dream Lawn
- Turf vs. Gravel Play Areas: Discover the Safer Choice for Kids
- Best Patio Pavers for New Jersey Backyards: A Complete Guide by Cedar Bridge Landscape Supply
- Cambridge Pavers vs. Techo-Bloc: Which Brand is Better for Your Project?


